In today’s time-poor, information dense marketing industry, the use of media in pages and posts is an important way to grab and hold attention.
So, here is a guide to effectively using media in WordPress pages and posts to brighten up your website.
Why Use Media in WordPress Pages and Posts
Thanks to modern technology, we have a world of information at our fingertips. For marketing professionals, this is both a blessing, and a curse. While there are many opportunities available, these same opportunities mean that it is easy to get lost in the crowd.
One way to ensure that you don’t get lost in the crowd is to use media in your WordPress website. A well-placed picture, or an attention-grabbing video could be the difference between attracting a potential client, or being lost in the ever-growing sea of pages and posts.
Images are a fantastic way to enhance your WordPress website or blog. Automatically, images add colour and vibrancy to your website. They engage your website visitors, and make your website more memorable by helping visitors make an emotional connection with your content. They even enhance SEO (provided you add descriptive file name and alt tags) and, with social networks becoming increasingly visual, website posts with images are much more likely to be shared on social media platforms.
How to Use Media in WordPress Pages and Posts
The first step in using media effectively in WordPress, is knowing how to embed media in your pages and posts. Luckily, the intuitive WordPress platform, and its Media Uploader Tool, make this easy.
Adding Images in WordPress
To add images in WordPress, log into the back-end of your website. Add or naviagte to the page or post to which you want to add an image, and then:
- Place your cursor in the position you want the image to appear in the content box.
- Click the ‘Add Media’ button.
![]()
- Click on the ‘Upload Files’ tab to upload and use a new image, or click on ‘Media Library’ to use an image from your existing media library.

- Click the ‘Edit Image’ button to change the tile, alternative text and description of the image. Via the ‘Edit Image’ button you can also rotate, scale and crop your selected image (to get the best from your image, always scale before doing any other editing). You can restore the image to its original at any time.
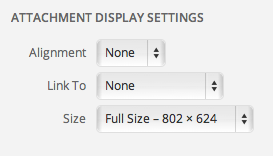
- The ‘attachment display settings’ allow you to set out the placement of the image in relation to the text and the margins.

- By choosing the ‘custom URL settings’ you can set the URL that you want the image to link to. This is quite an important step, as this dictates where your website visitor will be taken if they click on the image.
- After all the editing and fine-tuning, it’s finally time to insert the file. Simply click on the ‘insert into post’ button and make sure it sits well within your post.
Adding a PDF in WordPress
This is essentially the same as adding an image but instead you are uploading PDF document. Simply follow the above upload process and leave the option as ‘link to media file’ and then ‘insert into post’ which will create a hyperlink that when clicked it will open the PDF in the visitor’s browser.
Adding Videos in WordPress
Adding videos to a WordPress post or page is just as easy as adding an image. All you have to do is copy the URL into the content area (making sure it isn’t hyperlinked) and WordPress will automatically convert the URL into an embedded video. There is no need to add a screenshot here; it’s literally as easy as a copy and paste.
This process is limited to the sites WordPress has permission to link to, but the list is extensive.
Adding Audio in WordPress
This is essentially the same as adding Videos. Just copy the URL from the website that you found the audio, and WordPress will embed it for you.
How to Media Effectively
It’s important to keep in mind that any media you use in your WordPress pages and posts should be used effectively. So, ensure that your media:
- Supports your page or post: The media you include shouldn’t detract, or distract from the point of your page or post. Choose media that will maintain interest in what you are writing, not overshadow the writing.
- Is relevant to your market and your product: The media you select is an important part of your marketing collateral, so be sure to choose carefully. In some cases only a small, thumbnail sized image is appropriate or you risk making your post or page seem shallow. In others, images should outweigh words. Put as much effort into choosing media as you do into choosing words. Never add media just for the sake of it.
- Is the right size: If your media is too large it will take too long to load, and you risk losing potential website visitors. Too small, and it will seem like an afterthought.
- Is high quality: A low quality, pixilated image is as bad as a page or post littered with spelling mistakes and bad punctuation.
- Is accessible: Not everyone will be able to access the media you upload. The provision of effective alternative text means that visitors can still experience the media you have chosen, even if they can’t see, or hear it.
- Does not infringe on copyright: The Internet isn’t the free for all it used to be. Acknowledge your sources or risk litigation.
Now, head back to your WordPress website pages and posts and spice them up with some well placed and well chosen media. Remember, the selection of a fantastic piece of media can do more than 1000 perfectly sculpted words.
Visit https://en.support.wordpress.com/ for more information, and in-depth support for all things WordPress.
Sally Wood
Latest posts by Sally Wood (see all)
- 6 Free Marketing Plan Templates - July 22, 2018
- The Ultimate Guide to Instagram Advertising - June 23, 2018
- Q&A with Amy Cockerell, Marketing Coordinator at the TAC - October 6, 2016


